Friday, January 8, 2016

Hot Patterns Metropolitan Chimera Vest and Jacket

I have enjoyed sewing Hot Patterns lately.  After watching Trudy's video about the Metropolitan Chimera Vest and Jacket, I couldn't resist.  She always gets me with her videos.  There are many options with the pattern.


As you can see, you make a jacket/ cardigan, vest, short sleeves, long sleeves, belt, patch pockets, faux pockets, etc.  The instructions are fairly good.  There is a back facing piece that I didn't notice until I was finished with my first project, the vest.  I don't think it's really necessary.  Fabric recommendations are mid weight knit, such as ponte.  In the video, Trudy shows a vest made out of denim, but the back is a printed knit.

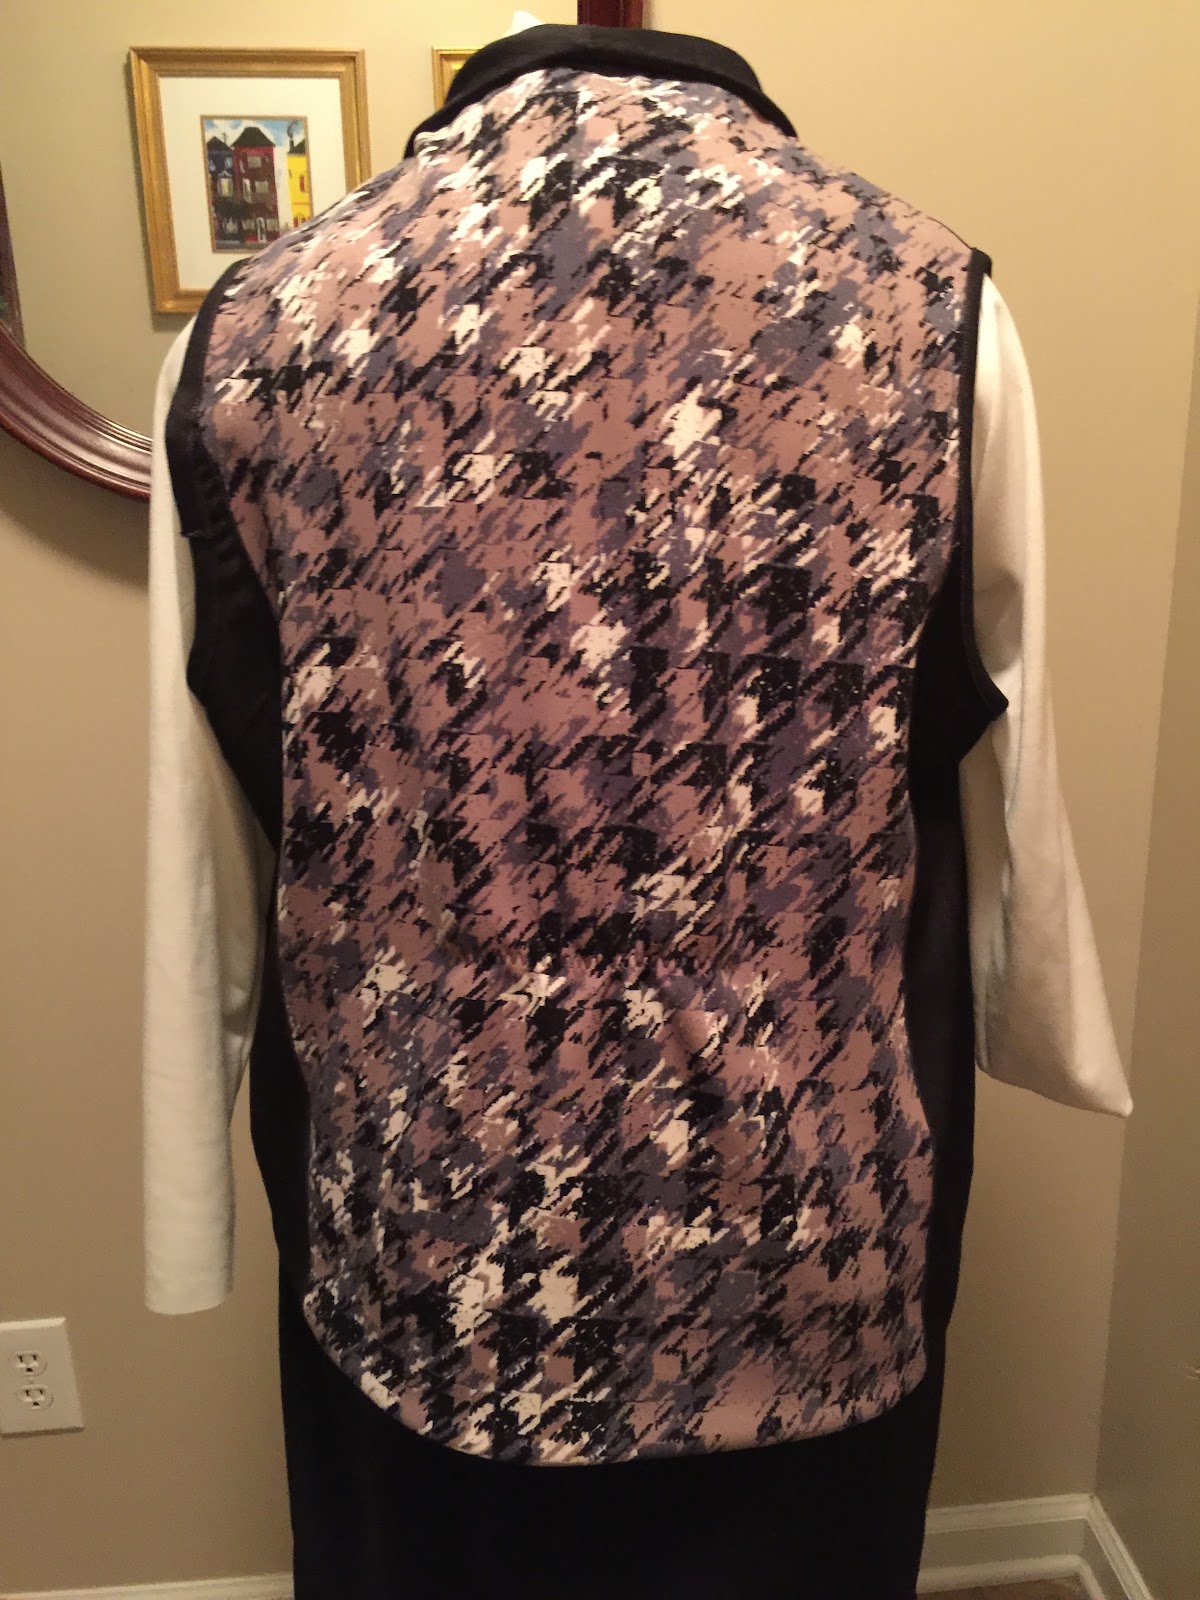
Having a fabulous scuba knit left over from a skirt I made, I decided to use it as the back of a vest.  The knit is from Gorgeous Fabrics.  I had never sewn with scuba knit before, but it won't be the last.  The Front of the vest is a tencel denim I purchased form Louise Cutting years ago.  I had made one seam pants with it, and had scraps left over.  I made faux pockets, and elastic on the center back to cinch in the waist.  The results:


Next was the cardigan.  I had a beautiful double knit from The Sewing Workshop.  I had been drooling over it on the website for a few days, when miraculously, it went on sale.  (The gods were with me that day.). It has a beautiful black, bronze, and grey print on one side, and charcoal grey on the other.

This version was long sleeves with patch pockets.  I felt the sizing ran large, which is often the case with Hot Patterns, so I took it in about 1/2 inch on each side.  The dress under the cardigan is drafted from my sloper from Sure Fit Designs.  The knit is an incredible quality from Emma One Sock Fabrics.  I had enough leftover for a t-shirt.  I matched the fabric with my Pantone swatches, and it worked great.  

I wore this outfit to a meeting yesterday and received lots of compliments.  This illustrates the many reasons I love to sew:  working with gorgeous fabrics, ability to choose from several design elements, and having well fitting clothes.

Saturday, December 26, 2015

A Trio of T-ShirtsI


I have lived my entire life in the south, with the exception of there years in Minot, ND. I have never experienced such a warm Christmas as we have had this year. For the first time in my 50+ years, I wore shorts and a t-shirt. I decided to embrace the strange tropical weather and make a trio of t-shirts. 

I have been rediscovering Hot Patterns lately. The owner, Trudy is delightful. Watching her videos on You Tube forces you to purchase her patterns. Trudy models all of her designs and proves that no matter your shape or size, you can look fabulous. Her patterns range in size from 6 - 26. 

Back to the t-shirts. I rarely sew all the views of a pattern, but these were so much fun, I sewed all three during my week off, including a muslin. 


This was the first of the trio - simple, very comfortable, and looks great under a cardigan or jacket. I plan to go to Versona to find the perfect pendant to wear with it. 

The stripe is probably my favorite. It looks complicated, but was very simple to sew.  It probably took me 2 hours, including cutting out. Trudy cautions that when using a stripe, make sure to have the darker color along the edge to make the most of the design. You can see from the photo why this is important.


Finally is the ruffle version, with the ruffles and hem left raw. I cut it out this morning, sewed it up, and wore it to lunch.

Sizing tends to run a little large, so I went down a size.


It has been eight months since I blogged, but I will try to do better this year. Later this weekend, I'll blog about my other completed project his week, the Hot Paterns Metropolitan Chimaron Cardigan and Sure Fit Designs t-shirt dress.

Happy Holidays everyone!

Saturday, April 26, 2014

The Sunny Top


I received this pattern from Australian Company StyleArc as part of a package of four tops.  I was intrigued by the pattern lines of the top and had never sewn anything with this shape.  Style Arc patterns are developed at an incredible pace to keep up with current trends.  An example is the Dotty Blouse that I posted about a few weeks ago.


Much has been written on this top on Stitcher's Guild - some good, some bad.  They key is having the right fabric.  It must be a very drapey, light fabric.  Otherwise, you will look like a great big, blob that just gained 30 pounds.  I used a very light rayon knit that has a sweatery texture from Gorgeous Fabrics.  Because the shoulder seam is dropped very  low, and the lower portion has a light arc, the side of the top drapes beautifully into a slouchy look.

It's important to select the right clothing to wear with this.  I wore this top yesterday with some white skinny pants from my new go - to pattern for casual summer pants, the Elle pattern also from Style Arc.


I plan to use this pattern to make some "faux" jeans with a fake fly front, front and back pockets with topstitching.  I recently purchased some Lee capri pants that were slip on, elastic waist that are so comfortable, but don't look like "pull on" pants.  (I'm a little depressed that I am at the age that I prefer "pull on pants".  Yikes!!!)

Anyway.....  I finished off the hems with a coverstitch with my new Bernina serger that I love.  I doubt I will make another Sunny top.  It's one of those pieces that you really only need one.

Hopefully, I'll add a couple of more posts this weekend, as I enjoy a low key, long weekend.  I am suddenly on a roll and determined to blog about more of my sewing projects.


Friday, April 25, 2014

Lydia's Easter Dress


In selecting an Easter dress for my granddaughter this year, I went out of my comfort zone and decided to make one of the beautiful creations from Kari Mecca at Sewing With Whimsey.  Kari has patterns for children's clothing with embellishments made from rick rack and ribbons.  The primary focus is on girls, but there are also ideas for boys.  I had purchased two of her books from a Christmas gift certificate, and asked my daughter (Lydia's Mom) to choose a dress for me to recreate.

The dress selected was available as a kit on the website.  It could be a challenge finding all the supplies I need in small town Alabama, so I ordered the kit.  It arrived in a beautiful organza bag.


The fabric was a high quality cotton pique, 100% cotton rick rack, ribbon, beads including a few shaped like lady bugs.  Everything was present to make the dress except for basic supplies.  I chose not to use the lady bugs because they were so dark.  When placed on the dress, they appeared to be specks of dirt instead of lady bugs.


Over 40 flowers were required, hand made from the rick rack.  This was easily done while watching TV with my husband, and were actually quite fun to make.

The lattice of rick rack was partly glued, partly sewn to some tear away interfacing.  The flowers with the centered beads were tacked on.
After attaching the lattice to the fabric, (praying it would all stay together) the dress was easy to construct.  The instructions provided were very clear to follow and it all came together well.  I did not add the flowers to the ribbon on the ties because I thought they would be too fussy for a two year old and not last long!

And the best results?  A happy Lydia on Easter!


Monday, March 24, 2014

I'm Back! Style Arc and Fabulous Fit

It's hard to believe it has been over a year since I have posted to my blog.  No, I have not dropped off the face of the earth, and yes, I continue to sew.  So much has happened over the past year that I have let my blog get a little rusty.

The biggest change since my last post was changing jobs.  I moved from Public Health  over to Medicaid and have no regrets.  The new position has been challenging, rewarding, but very time consuming.  My granddaughter continues to grow and gets cuter by the minute.  Currently I am making her Easter dress from a kit from Kari Mecca at Sewing with Whimsy.  I promise to post pictures in a few days.

I have acquired some great sewing tools lately -  the biggest being my new Bernina 1300MDC Serger with coverstitch hem.  There is a learning curve, but I'm getting there and really like the new machine.  I'm working on changing from overlock to cover stitch with greater speed (not the 15-20 minutes it takes now!)

The other great tool I received last weekend was the Fabulous Fit Padding System.


You can take an existing dress form and pad it to your exact measurements.  I have a "duct tape" dress form I love that was made 8 years ago.  However, I have gained weight so it wasn't much use.  I considered purchasing a new form, but realized I liked the perfect sloping shoulders, height of my body, and the slight curve in my upper back that was captured in my dress form.  The Padding System seemed to be the perfect solution, and it was!  I was able to get my exact shape and measurements after a couple of hours, and the nice cover makes it appear brand new.  If I lose weight (someday!!!), I can just remove some of the padding.  It works great and now I feel I have a new form.

Now on to Style Arc.  I had sewed some of the patterns for my daughter, but kept telling myself I would order after losing weight.  Finally, I decided life is too short and took the plunge.  In January, I took advantage of the "tops/blouses" special and ordered four patterns for the price of two.  The one pattern I was unsure of was the Dotty Blouse..

I wasn't sure how flattering it would be, until I saw it in Ann Taylor, and the same style on a very chic coworker.  I dug through my growing fabric stash and found the perfect  fabric -  sheer drapey chiffon type fabric.  (In other words, I'm not exactly sure what it is!)  I heard purchased it from Fabric Mart a year ago.  It worked out great!  Due to the sheer factor,  I wear with a cami underneath.  The back was tricky - limited (actually no) instructions.  Since it was a sheer fabric, I just turned it under at the back neck and stitched.  I used Lousie Cutting's instructions for making a nice curved shirt hem (rolled hem) for the back.  Here is the result on my "new" dress form:


  Back View:


And side view.


I found this blouse to be surprisingly flattering and slimmjing.  I wore it with some ponte pants (also Style Arc) but think it would look equally good with a pencil skirt.

That's it for now.  Next up will be Lydia's Easter dress.  Stay tunned!

Tuesday, December 18, 2012

The Eureka Skirt


I purchased the pattern from The Sewing Workshop for the unique lines of the skirt and the endless possibilities for the top, which can be made with knits and drapey wovens.  The skirt has no side seams except for the yoke.  The lower portion is placed on the bias.  I'm not sure what impact this has on knits, but the results are wonderful.  Here are the line drawings for the pattern:

The front is identical to the front, and the centers hang beautifully.  I forgot to shorten the pattern prior to cutting it out, so I took off 1 1/2 inches at the yoke, and 2 1/2 inches at the bottom for my 5'2 inch frame.  Next time I make it, I'll take the same amount off the yoke and use the line on the pattern for shortening so it will be slightly fuller at the bottom.  My fabric was a black ponte knit.

I was pleased with the results:

I can see this in a linen/rayon for summer or pretty cotton.  There will certainly be more in a ponte knit in my future.

Credit also goes to my trusty boxer, Sammi, who stood by me all the way in making this skirt.  I'm wearing it with the e-shrug from The Sewing Workshop and fabric from Marcy Tilton.

Saturday, October 6, 2012

Ready for Halloween!


When I saw the candy corn smocking pattern from Creations by Michie in Sew Beautiful, I knew I had to make a new dress for Lydia.  Instead of the black in the magazine, I chose a black and white gingham.  I had to change the border colors some to make the colors standout from the gingham.  I used Pattern #132 from Michie Mooney: 

I eliminated the panel, smocking the skirt just below the yoke.  It was a fun item to smock, and the first picture smocking I have done since my daughter was small.

Lydia models it well, and selected wonderful accessories for the outfit.  I think she's ready for Halloween.  Her Grandma will be in Houston to celebrate it with her.

Sunday, July 29, 2012

More Sure Fit Designs


I have been wanting a skirt out of eyelet for the longest time.  Add to that my fascination with orange this summer and the result is this skirt.  I purchased the fabric from Gorgeous Fabrics and just love. it.   The eyelet is out of cotton, and the orange lining is also out of cotton and has a slight sheen to it.

Because I am currently losing weight at the moment (15 pounds and counting), I'm not ever sure how to cut it out.  I'm a couple of pounds lighter than when I made my Sure Fit Designs blue print.  So I used it as a starting point, and originally drafted an a-line skirt.  I didn't like the a-line style for this skirt, so cut it back to just a straight skirt.  Because of the fabric, it needed very little ease, so I eventually took in two inches total at the sides (1/2 inch seam allowances).

If you are new to my blog, you'll find out very soon that I am a major fan of Sure Fit Designs.  It is a system that allows you to draft your own sloper, or as the system calls it, Blue Print, from which you can draft your own patterns.  I've used it for over a year with great success.  You can learn more about the system at Sure Fit Designs

I cut out the design of the eyelet on the bottom, and finished the top with a facing.  Zipper is on the side.  I wish I had placed the zipper in the back, but wasn't thinking when I cut it out.  It will be more challenging to take in as I continue to lose weight.  Oh well....

The next challenge was deciding what to wear with my new skirt.  I made the t-shirt below for it, but it was just too bland together.  So I went on the hunt for something and lucked out with this orange bolero/ cardigan at T J Max.  That was a miracle since I never find anything at T J Max.  I paid only $9.00  (Yay!)  After some trial and error, I decided the shell from the Loes Hinse sweater set was the perfect addition to the ensemble.


Sunday, June 24, 2012

One More Dress for Lydia


As I wait to go to Houston to meet my new granddaughter, I have made another smocked dress.  This one is from the Children's Corner and is their Bishop's Dress, Gwen view.  A coworker gave me her pattern.  (Thanks Wendy!)  I really like this pattern and know I will use it over and over.  It is multisized, so I hope I can use it until Lydia is at least three or four years old.

This was the first Bishop's dress I have made and it wasn't as hard to pleat as I thought it would be.  I held my breath but that fabric went through my Amanda Jane Pleater like butter.  That is, until I got to the seams. I only broke two needles!  Next time, I will trim the seams more and use a zig zag stitch.  Hopefully, there will be no more broken needles.


The smocking was a lot of fun.  This was a free design in this month's Sew Beautiful Magazine.  I love that magazine and am proud that Martha Pullen is from Alabama.

Hopefully, I can get one more dress made before I leave for Houston in a week and a half.  This one will not be pleated, so I should have plenty of time to complete it.


Friday, June 15, 2012

Maxi #2


I had so much fun making the maxi dress for my daughter, I decided to make one for me.  Someone on Stitcher's Guild suggested that the CJ Pleat Front dress might make a good maxi.  I had just made this pattern in a short version, sleeveless.  Unlike the previous dress, I remembered to raise the armhole 1 inch.  I also lengthened it 15 inches.

The fabric is from Gorgeous Fabrics.  I loooove this fabric!  It's a jersey knit that drapes beautifully and has some weight to it.  Last I looked, Ann had more of this fabric in three different colors.

This will be a great dress to have in Houston as I visit with my daughter, son-in-law, and my precious granddaughter, Lydia.  My daughter's due date is tomorrow, so we are all on pins and needles waiting for the new arrival.

Sunday, June 10, 2012

What To Wear on Maternity Leave

My granddaughter is due any day now and I have been very busy smocking dresses and making a baby quilt.  But I must not forget Mom.  When we were shopping, Stefanie admired several maxi dresses, many of the striped and waaay over priced ($85 - $100).  I found this wonderful striped fabric from Gorgeous Fabrics and incredibly soft.  I think it is not only beautiful, but very comfortable.

I can't wait to get to Houston to see that precious granddaughter and my wonderful daughter, who I am so proud of!

Saturday, June 9, 2012

Adventures in Color Blocking


I have been wanting to make a color blocked dress for quite some time.  I had purchased the light green and orange ponte from Sawyer Brook several months ago, trying to decide what to do.  I decided it needed something more, so purchased the fuchsia knit a couple of weeks ago.  This knit was lighter weight than the others, even though it was also a ponte.  So I doubled it at the bottom to make a band, eliminating the hem.

I used my Sure Fit Designs dress kit/ knit top with a dart and the leaflet instructions for making dolman sleeves.  The idea of the curved lines came from a new Vogue pattern.

Here I am on a very humid day.  The picture, along with the angle isn't great, but you get the idea.
I had enough fuchsia left over and some black and white knit stripe from Marcy Tilton to make a top.
These were a lot of fun and quick to make.  The drafting took less time than I anticipated.

Monday, May 28, 2012

THE LUNA TOP


I decided tops and blouses were the next thing for me as I lose weight.  First up was the Luna Top from The Sewing Workshop.  I had made the Stella top from the same pattern in a knit.  A few months ago, I found this fabric from Sawyer Brook and thought it would be perfect for this pattern.  It's a rayon, crepey fabric, that looks like patchwork in different floral prints.

The alterations I made were my usual - sloping, narrow shoulders and a high rounded back.  I did not need an FBA because it's fairly loose fitting.  I omitted the zipper when I realized it would fit easily over my head.  The bottom is buttoned, but I decided to sew the diagonal lines at the bottom and attached the buttons.  As I lose weight, I can take it up at the side seams.

The challenge was in the bias seams on the cowl front with slippery fabric.  It took lots of pinning, which I don't really enjoy.  After that, it came together like a breeze.

Here's a picture of me in it with a pair of white jeans I bought about four weeks ago and couldn't zip up at the time.  (Hurray for me for getting them on, and now they aren't even too tight.)  Pardon the expression on my face.  It's already 90 degrees in Alabama and the sun was in my eyes.


I wore it  on a road trip to Florida today to spend Memorial Day with my husband's Aunt Janie.  She was a surrogate mother to him and is still quite feisty at age 90.  I hope to be just like her.  Here's Aunt Janie and my stepson.  Can you believe how tall he is at age 16?  It was a wonderful day.


Happy Memorial Day everyone!

Saturday, May 26, 2012

Sewing While Losing Weight

I am determined to lose weight with the help of Weight Watchers.  I'm at the heaviest I have ever been, and my eating was out of control.  Therefore, I took control by joining Weight Watchers at Work.  I am a Lifetime member, but what does that mean when you need to lose 30 pounds?  So much for Maintenance!

I decided to make my weight loss public through this blog to make myself more accountable.  I have a couple of partners in this endeavor - a coworker, and my stepson.  It's so much easier to do this with someone.  So far, I have lost 7 pounds, and have 27 more pounds to go.  I am confident I can do it.

While losing weight, I still want to sew, so I've been focusing on clothes I can alter while losing weight, starting with pants.  I made a pair of capris with my Sure Fit Designs pants kit, and loved the style, so I decided to make them full length in khaki and navy blue. The pocket design is from the new booklet from Sure Fit Designs.


I chose this design because it will be easy to alter during the weight loss without losing the pocket.  I can just take it up at the sides.  Also, I sewed the waistband with a 3.0 length stitch so it would be easy to remove and did not top stitch.  Here's a picture of the pants with a top tucked in.


This is how I will actually wear them.

And here they are in Navy.  I love these pants.  They are a cotton lycra, so very comfy.  I narrowed the pant leg and like the width.
As I lose weight, and alter, I plan to post more pictures.  When I get to my goal weight, I plan to take a picture and compare it side by side with these.  How fun will that be?  Something to work toward, and fun to see the results.

Tuesday, May 8, 2012

Every Baby Girl Needs a Pink Dress


I am traveling to Houston on Friday for one last mother-daughter weekend before Lydia arrives in June.  It was great timing that we could do this on Mother's Day.  It was miraculous that I could find an organist to fill in for me at church this weekend.

I was able to finish another smocked dress before I go.  This one is by Michie Mooney.  I love her patterns and her blog.  Creations by Michie  I found the material at a wonderful heirloom shop in Louisville, KY when I was at a meeting of the Southern Health Association in March.  The smocking plate was perfect to echo the print of pink flowers and green leaves.


The actual plate was for a bishop dress, so I altered it, omitting some of the design toward the end and repeating the border from the top.  I can't wait to take a picture of this dress on Lydia.

I will be taking the sundress, the quilt, and the daygown with me on Friday.

I hope everyone has a wonderful weekend.   I know I will.  I  am blessed to have such a wonderful daughter, who is already becoming a wonderful Mom.